If you don’t know anything about SSL (Secure Sockets Layer), it’s the standard security protocol to establish an encrypted link between a server and a web browser. The link ensures that all communications are private and that hackers cannot snoop traffic. By following this guide you will learn what an SSL certificate is and how to add an SSL certificate to Apache2 Server.
SSL Certificate
An SSL certificate is a small data file that digitally binds a cryptographic key to an organization’s details. Basically, we are trying to prove that we are who we tell we are to a user.
When installed on a web server, it activates the padlock and the https protocol and allows secure connections to a web server from a browser.

SSL Certificate binds together,
- A domain name
- An organizational identity
How Does an SSL Certificate Work?
There are two keys which are randomly generated long strings; Namely a public key and a private key. In cryptography, the public key is shared with a third party, and the third party encrypts the message using the public key. The importance is that without knowing the private key, it’s impossible to decode the message.
Assume the scenario. Alice has the public key of Bob. Alice sends a message encrypted using Bob’s public key. Bob uses his private key to decode the message. Without the private key, it’s impractical to decode the message.
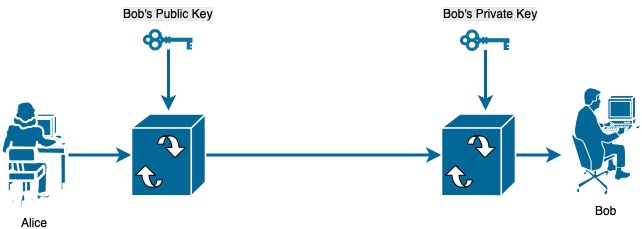
However, an important question is how does Alice verify Bob’s public key. An intruder could pretend to be Bob and send the public key to intersect all communications. This is where SSL certificates come in to the picture. SSL certificates gurantee that indeed it’s Bob’s public key.
A public key is known to the server, and whenever a client initiates an SSL / TLS communication, the server sends the public key / certificate. The certificate contains the public key and the client has to verify that the certificate is valid.
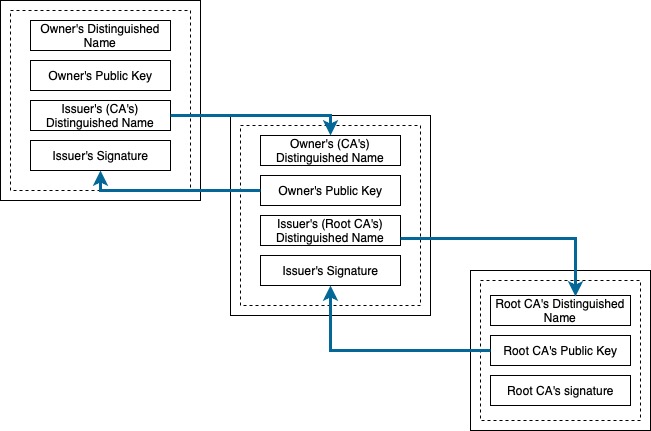
A certificate has two main components.
- Public key
- Certificate Authority’s digital signature
The browser will try to establish a chain of trust by validating each component up until the root certificate. A digital signature is essentially a token and encrypted data pair. The encrypted data contains the token encrypted using a private key of the Certificate Authority. The public key (of the Certificate Authority) can then be used to decrypt the encrypted token (Essentially we are doing the inverse of what we did before to verify). If the token matches with the decoded data, we have validated the public key of the party.
How do I get an SSL certificate?
You can choose from a number of providers such as “NameCheap”, “GoDaddy” or “Let’s Encrypt”. Usually, it’s about $9 per year for a single domain certificate (with wildcard).
If you’re a student, through the GitHub education pack you can get a Namecheap certificate for free without giving them any credit card information. Now, that’s a deal!
If you’re going with Namecheap, the cheapest option would be Postive SSL which will cover you for the most of the functionalities. After you have purchased the certificate, we will need to generate a public, private key pair.
This is known as CSR (Certificate Signing Request) generation and all linux distributions have a tool to do this. You will need to know the web server that you’re using at this point.
To generate a CSR, first we will create a directory called ssl-keys to store our keys.
mkdir ~/ssl-keys
cd ~/ssl-keys
Next enter the command below. Replace “server” with your domain name (eg:- example.com).
openssl req -new -newkey rsa:2048 -nodes -keyout server.key \
-out server.csr
You will be prompted to fill in information about your company and domain name. It’s strongly recommended that all the fields are filled in.
*.csr file contains the CSR code that you need to submit during certificate activation. It can be opened with a text editor. Usually it looks like a block of code with a header: “—–BEGIN CERTIFICATE REQUEST—-“ It is recommended to submit a CSR with the header and footer.
Namecheap ssl installation guide
*.key file is the Private Key, which will be used for decryption during SSL/TLS session establishment between a server and a client. It has such a header: “—–BEGIN RSA PRIVATE KEY—–“. Please make sure that the private key is saved as it will be impossible to install the certificate without it on the server afterwards.
Now, you need to activate your certificate by submitting your CSR to the issuer. Remember, keep your private key safe. That’s only for your eyes. The issuer will then perform a domain validation to ensure that you have the authority over the domain. There are three ways of validating this.
- HTTP-based
- CNAME DNS-based validation
The easiest would be email validation. When you submit the request the issuer tries to look up the WHO IS record to figure out the email of the domain owner or a default address thought to be of the domain (such as info@example.com, admin@example.com).
For example, I have protected my WHO IS record so that my private information is not available. So, my email was displayed to me as adfw23er3r231@contactprivacy.com. Therefore, I had to choose another email such as admin@example.com. If you don’t know how to create an email for your domain, check with your domain provider. Most domain providers allow email forwarding to an email address.
After you have submitted your request you will receive a zip folder containing your certificate and the apache server bundle.
How to install the SSL certificate on my Server?
Extract the content of your zip folder to your server. You will have two files called your-domain-name.crt and your-domain-name.ca-bundle. If you’re on your local machine you might need to scp the zip folder to your server.
Remember!!!: Do not keep your certificate files in your /tmp/ directory. Keep them in a folder only accessible by Apache.
The guide uses the /tmp/ directory just to copy files in between without directly modifying system file folders.
scp certificate-folder.zip your_domain_name:/tmp/On your server, extract your zip folder.
unzip /tmp/certificate-folder.zip
Create two folders in /etc/ssl to store your public, private keys and the certificate called ssl.key and ssl.cert.
sudo mkdir /etc/ssl/ssl.key
sudo mkdir /etc/ssl/ssl.cert
Move your private key to the ssl.key folder. Move your your-domain-name.crt and your-domain-name.ca-bundle files to ssl.cert.
sudo mv /tmp/certificate-folder/your-domain-name.crt /etc/ssl/ssl.cert
sudo mv /tmp/certificate-folder/your-domain-name.ca-bundle /etc/ssl/ssl.cert
sudo mv ~/ssl-keys/server.key /etc/ssl/ssl.key
That’s pretty much the installation. Now, we need to configure Apache to read the certificate and key files.
Configuring the Apache Server to use SSL
The easiest way would be to enable a virtual host and specify the private key and the certificate and the bundle. Navigate to the folder /etc/apache2/sites-enabled/. Create a configuration file named example.com.conf. Copy the following code block to the file.
You will have to enable ssl on your apache2 server if you haven’t already done so by
Helpful Tips 😉sudo a2enmod ssl
<IfModule mod_ssl.c>
        <VirtualHost *:80>
                ServerName example.com
                Redirect / https://example.com/
        </VirtualHost>
	<VirtualHost _default_:443>
		ServerAdmin email@example.com
                ServerName example.com
		DocumentRoot /var/www/html

		ErrorLog ${APACHE_LOG_DIR}/error.log
		CustomLog ${APACHE_LOG_DIR}/access.log combined

		SSLEngine on

		SSLCertificateFile	/etc/ssl/ssl.crt/your-domain-name.crt
		SSLCertificateKeyFile /etc/ssl/ssl.key/server.key
	        SSLCertificateChainFile /etc/ssl/ssl.crt/your-domain-name.ca-bundle
		#SSLVerifyClient require
		#SSLVerifyDepth  10

		<FilesMatch "\.(cgi|shtml|phtml|php)$">
				SSLOptions +StdEnvVars
		</FilesMatch>
		<Directory /usr/lib/cgi-bin>
				SSLOptions +StdEnvVars
		</Directory>
	</VirtualHost>
</IfModule>
The code block specified below enables http redirection to https.
<VirtualHost *:80>
        ServerName example.com
        Redirect / https://example.com/
</VirtualHost>
You will need to add the below entries and verify before you restart your server
SSLEngine on
SSLCertificateKeyFile /etc/ssl/ssl.key/server.key
SSLCertificateFile /etc/ssl/ssl.crt/your-domain-name.crt
SSLCertificateChainFile /etc/ssl/ssl.crt/your-domain-name.ca-bundle
Save your configuration and restart your Apache server.
sudo systemctl restart apache2Now, ssl should be working. You can check your ssl connection by the following command. If the hand shake is successful ssl works on your server.
openssl s_client -CApath /etc/ssl/certs/ -connect your-domain-name.com:443Let me summarize the process that we had to go through.
Time needed: 10 minutes
How to add an SSL certificate to Apache2 Server?
- What’s an SSL certificate?
An SSL certificate is a small data file that digitally binds a cryptographic key to an organization’s details. Basically, we are trying to prove that we are who we tell we are to a user.

- How does an SSL certificate work?

- How do I get an SSL certificate?
You can choose from a number of providers such as “NameCheap”, “GoDaddy” or “Let’s Encrypt”. There’s a way you can get a certificate for free without a credit card.
- How to install the certificate on Apache2?
It’s easy. You just need to create a virtual host configuration file and enter the below details.
SSLEngine on
SSLCertificateKeyFile /etc/ssl/ssl.key/server.key
SSLCertificateFile /etc/ssl/ssl.crt/your-domain-name.crt
SSLCertificateChainFile /etc/ssl/ssl.crt/your-domain-name.ca-bundle